

Propagating succulents is a fun and rewarding way to multiply your collection without spending any money. It is also a great way to save a sick or struggling plant by propagating succulents via healthy stem cuttings. In this article, we will cover the four main methods of propagating succulents: leaves, cuttings, water, and seeds.

Succulent Propagation Guides and Timelines:

Propagating Succulent Leaves
First, let’s start with propagating succulent leaves. This method works best for plants with plump, fleshy leaves. To propagate a leaf, gently twist it off the stem and lay it on a well-draining soil mix. Water the soil lightly and place the pot in a sunny spot. It can take several weeks or even months for roots to grow, so be patient and keep the soil moist but not waterlogged. Once roots have formed, you can carefully transplant the new plant into a pot of its own.
Why are Succulents Able to Grow From Just a Leaf?
Succulent leaves grow roots because they are designed to survive in adverse conditions. When a succulent leaf is separated from the main plant, it has the ability to grow roots in order to establish itself as a new plant and continue to photosynthesize and absorb water and nutrients from the soil. This is a survival mechanism that allows succulents to propagate and spread, ensuring the survival of the species.

In addition, the production of roots from leaves is a natural part of the succulent’s life cycle and helps the plant to grow and thrive.
Propagating succulents by leaf is one of the ways I find the most satisfying. I really have to work on my patience and self control because all I want to do is love them!


Step 1: Twist off the leaves from the stem
To begin propagating succulents by their leaves, you’ll need to first twist off a few healthy leaves from the stem of the parent plant. It’s important to twist the leaves off rather than cutting them, as cutting the leaves can damage the end of the leaf, which is necessary for the propagation process.
To twist off the leaves, gently hold the base of the leaf with one hand and use your other hand to twist the leaf clockwise until it comes off. Repeat this process with a few more leaves, taking care not to damage the parent plant in the process.

Step 2: Prepare the soil or don’t
Once you have collected your leaves, it’s time to prepare the soil for planting. Succulents prefer well-draining soil, so it’s important to choose a soil mix that is designed specifically for succulents or cacti. You can also create your own soil mix by combining equal parts potting soil, perlite, and sand.


Leave the Leaves Alone and Let Them do Their Thing
I prefer to let my leaves chill outside of soil on a nice, dry surface when propagating succulents via their leaves. I’ve used a cardboard box, little basket, table top, whatever. It doesn’t matter much when the propagating leaves are first starting out. Some leaves will make it to the next step and some will shrivel up and die. That’s just the way it goes. The leaves that have formed roots and/or leaves will make it to the soil.

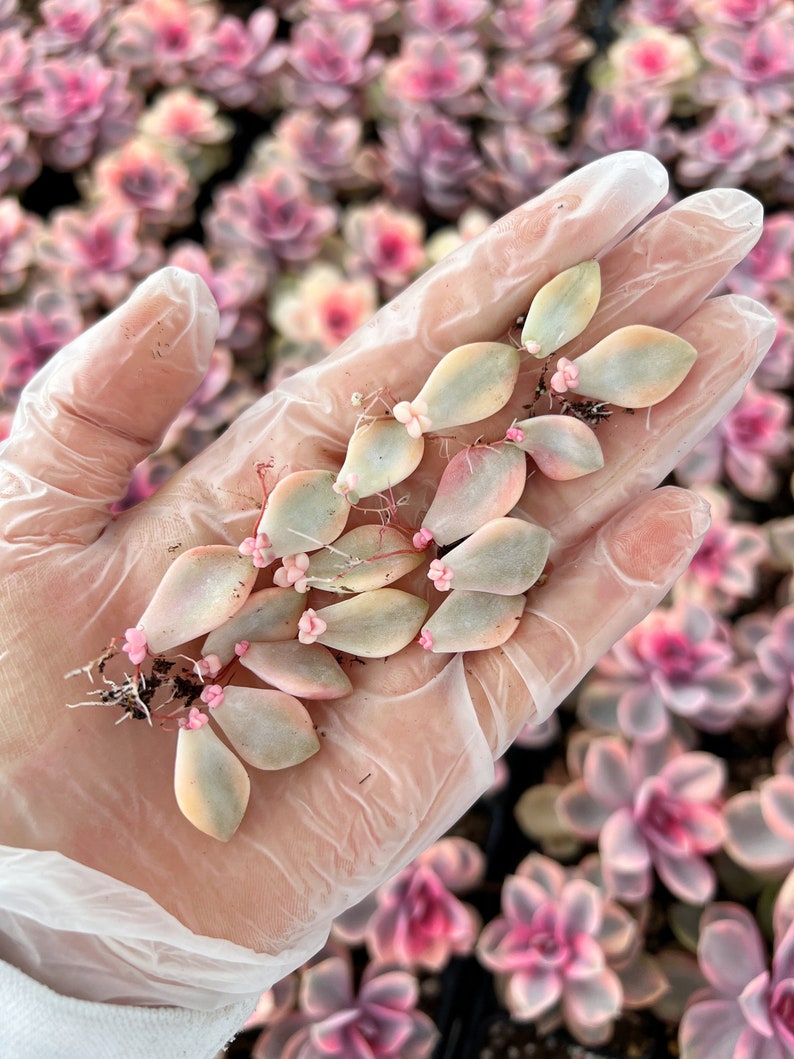
Source: Etsy
Step 3: Plant the leaves in soil
Once your soil is prepared, it’s time to plant the leaves. Place the leaves on top of the soil in a small pot or tray, taking care not to bury the leaves too deeply. You can also lay the leaves flat on the soil, rather than standing them upright, if you prefer. I do a hybrid of both when propagating succulents by leaf. Their little, pink roots are so delicate and any movement will create micro tears allowing bacteria in.

How to Not Disturb the Roots
To create the least amount of disturbance, I take a chopstick and poke a hole where I want the roots to go. I put the leaf on top of the soil and wiggle the roots into the hole. I don’t cover the leaves purposely. I want the roots to get plenty of oxygen while making their way into the hole in the soil.

Source: Etsy

Step 4: Water the propagated succulents
After planting the leaves, water the soil lightly and place the pot or tray in a bright, indirect light location. My favorite spot to stash my leaves is on a covered porch so that natural light still reaches the leaves, but isn’t direct or harsh. Succulents prefer bright, indirect light, so it’s important to find a location that gets plenty of light without being in direct sunlight.
When propagating succulents by leaf it’s also important to water them sparingly, as too much water can cause the leaves to rot. Water the soil lightly every few days, or as needed, and be sure to allow the soil to dry out completely between watering. You can use a spray bottle to wet the top layer of soil. The ONLY time I’d recommend misting is when propagating succulents by leaf.


Step 5: Monitor and care for the propagated succulents
As the leaves begin to grow roots and new growth appears, you’ll need to monitor and care for the propagating succulents. Keep an eye on the soil moisture level and adjust your watering schedule as needed.
It’s also important to fertilize the plants occasionally, using a balanced succulent fertilizer or a diluted all-purpose fertilizer. Avoid touching them as much as possible while they’re in the early stages of propagation because any disturbance can cause the little plants to die.
Source: Etsy
Why are my succulent leaf propagation roots turning brown?
Brown succulent leaf propagation roots usually indicate they have dried out, rather than being overwatered or diseased. Here are some more details on roots turning brown due to drying out:
- Roots need moisture – Just like above-ground tissues, roots require water to remain hydrated, flexible and healthy looking.
- Improper environment – Cuttings may dry out if the growing conditions are too hot, arid, or have poor humidity levels. Warm air can dehydrate roots quickly. I leave my succulent leaves in a cardboard box on a shelf in my nursery patio area where they get lots of bright, indirect light but are still protected from the elements.
- Infrequent watering – Waiting too long between light mistings/waterings allows the soil and roots to fully dry out before being rehydrated. (Never mist the leaf surface. Only mist the soil/root area. Misting sprayers are great for this because they aren’t powerful and won’t disturb the fragile roots.
- Small root system – Tiny fledgling roots have less surface area to take up moisture from the soil. They dry much faster than mature roots. When propagating leaves, you can keep the soil moist longer than you would an established succulent.
The process of producing roots from a leaf is called vegetative reproduction, and it allows succulents to regenerate and propagate themselves through the production of new plants. This can be an effective way of propagating succulents and growing new plants, especially if the original plant is healthy and actively growing.


Succulent Leaf Propagation Timelapse

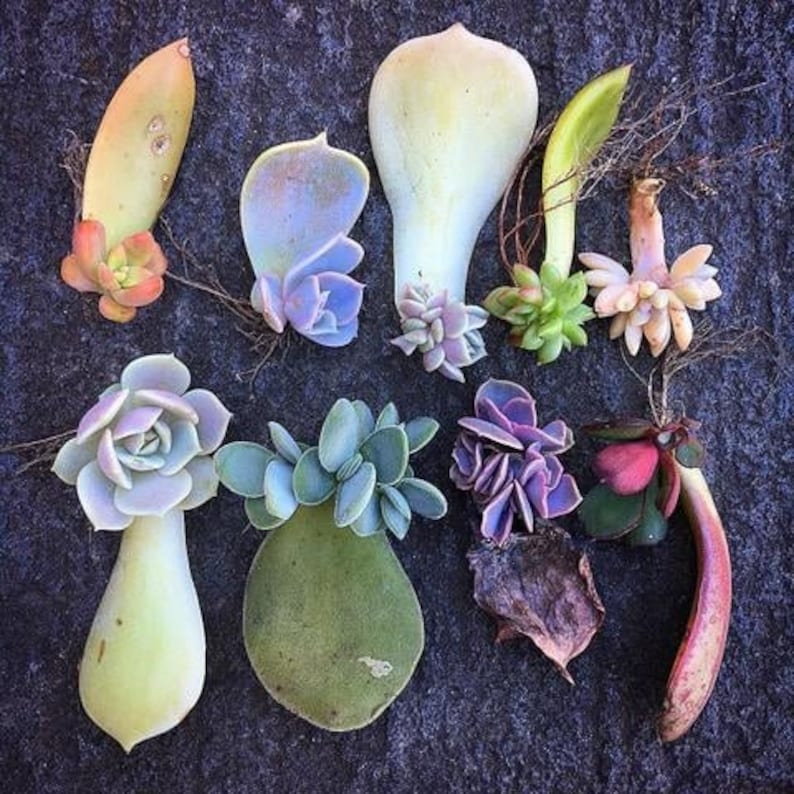
Propagating Succulent Cuttings
Next, we will discuss propagating succulents via stem cuttings. This method works best for plants with woody stems, such as Sedums or Echeverias. Propagating succulents via stem cuttings in soil is a simple and effective way to grow new plants from existing ones. It’s a great way to expand your collection or share plants with friends and family. With a few basic supplies and a little bit of patience, you can easily be propagating succulents at home.
Source: Etsy

Root nodes are the points on a plant stem where roots are produced. In the case of succulent cuttings, root nodes are the areas where roots are most likely to form when the cutting is placed in soil or water for propagation. Root nodes are typically found near the base of the plant or along the stem, and they contain tissues that are capable of producing roots when the right conditions are present.

Understanding where root nodes are located on a plant can be helpful when propagating succulents from cuttings, as this can increase the chances of successful rooting and help you determine where to place the cutting in the soil or water.


Once you have your supplies ready, follow these steps to propagating succulents by placing the stem cuttings in soil:

Step 1: Pick Your Cuttings
Choose a healthy, mature succulent with a woody stem. Cuttings from softer, younger stems may not root as easily. Avoid using cuttings with flowers or new growth. This is because the plant’s energy is focused on producing flowers and seeds, rather than on producing new growth.
Additionally, the process of flowering can be stressful for the plant, which may affect its ability to propagate. However, it is still possible to try propagating succulents by stem cuttings when they’re flowering and see if it takes root. It may just take longer or be less successful compared to a non-flowering cutting.

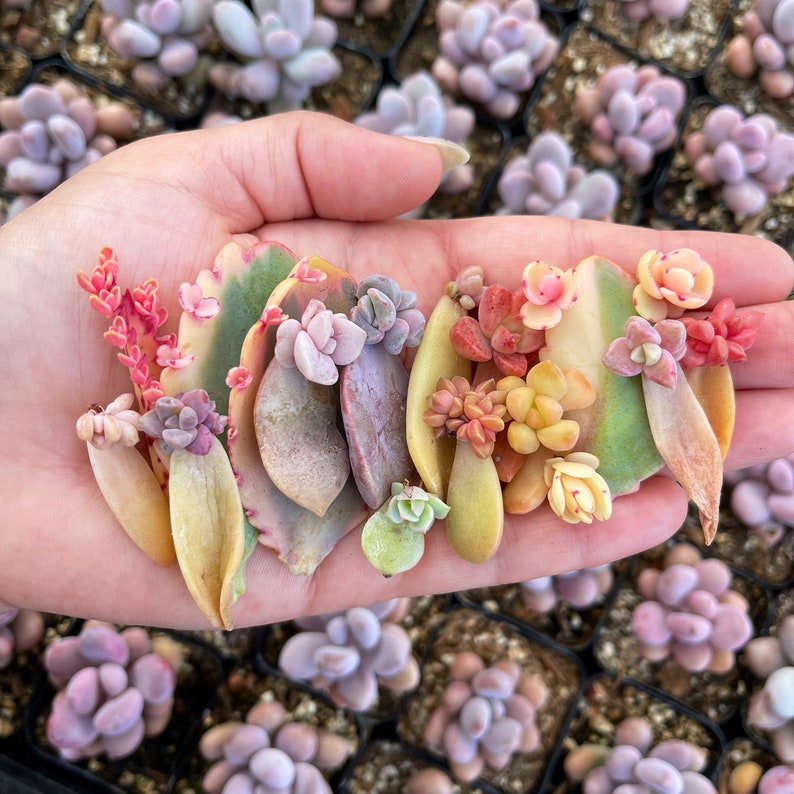
Source: Etsy

Step 2: Cut Your Cuttings
Using your scissors or pruning shears, cut a 4-6 inch piece from the end of the stem. Make the cut at a 45-degree angle just above a node (the point where a leaf attaches to the stem). If you want, dip the cut end of the stem into a rooting hormone to encourage quicker rooting.
Let it Form a Callus
When the cut end has dried and callused over, it is ready for soil. It is important to wait until the cut end of a succulent cutting has callused over before planting it because the callus is a layer of cells that forms over the wound on the cutting. This process helps to protect the cutting and prevent it from rotting or getting infected by pests or diseases.

After the Callus Has Formed
When the callus has formed, it means that the cutting has properly sealed itself off and is ready to be planted. Planting a cutting before the callus has formed can expose the cutting to too much moisture and increase the risk of rot or infection. By waiting until the callus has formed, you can help ensure that the cutting has the best chance of surviving and thriving once it is planted.

Source: Etsy
Step 3: Soil for Cuttings
Fill your container with well-draining succulent soil mix. Make a hole in the soil with your finger or a pencil, and insert the cutting into the hole so that the cut end is buried about 1 inch deep. Gently pat down the soil around the cutting to secure it in place. You want the cutting to be making contact with the soil, but still have airflow around it.
Step 4: Roots
With a little bit of care and patience, your succulent cuttings should begin to grow roots within a few weeks to a few months.
How to Check for Roots
To check for roots, give the cuttings a gentle tug. If there’s any resistance, the root system is strong enough to transplant. Once the cuttings have developed a good root system, you can transplant the propagated cuttings into individual pots or incorporate them into your outdoor garden.
Step 5: Water
Water your cuttings deeply once roots have formed and only water again when the soil has fully dried out. As the cutting begins to grow and establish itself, gradually increase the amount of water and sunlight it receives.

Trimming Your Succulents is Important for Maintenance and Longevity
When succulents grow too long and heavy, they can fall off or look unappealing. Trimming is a great way to restore an arrangement to its original look without having to uproot the plants and replant them. Additionally, trimming succulents can make them look fuller, and it can encourage new growth. Dead leaves and branches should also be removed to encourage new sprouts.
Not all succulents can be trimmed this way, and this kind of propagation works best for succulents that have stems or branches. When succulents are left to grow too long, they can lose their unique features, and some may not be able to form new babies because they lack the proper nutrients. By trimming, succulents can remain healthy, continue to grow, and display their unique features.
Propagating Succulents in Water
Propagating succulent cuttings or leaves in water is another easy method for multiplying your succulent collection. This method works best for plants with thin, delicate stems as well as single leaves.

Step 1: Select the Right Leaves
The first step in propagating succulents in water is selecting the right leaves. Look for leaves that are healthy and undamaged, as these are more likely to root successfully. It is also important to choose leaves that are plump and firm, as softer leaves are more prone to rotting.
Step 2: Twist Off the Leaves
Next, gently twist the leaves off the stem of the succulent plant. Be sure to twist them off without damaging the end, as this is where the roots will eventually form. It is also a good idea to let the leaves callus over for a few days before placing them in water, as this will help prevent rotting during the early stages of propagation.
Step 3: Place the Leaves on top of the Water
Once the leaves are ready, fill a jar or container with clean water and place a piece of plastic wrap over the mouth of the jar. Poke small holes in the plastic wrap and put a leaf in each hole so it is suspended over the water Be sure to use a clear container so you can easily monitor the roots as they form. It is also a good idea to change the water every few days to prevent bacterial growth.


Step 4: Wait for Roots to Form
Roots will typically begin to form within a few weeks, although the exact timeline will depend on the type of succulent and the conditions in which it is being propagated. Once the roots are a few inches long, they are ready to be transplanted into soil.
Step 5: Transplant the Rooted Cuttings
To transplant the rooted cuttings, fill a small pot with a well-draining soil mix and gently place the rooted cutting inside. Water the soil lightly and place the pot in a location with bright, indirect light. Be sure to keep the soil evenly moist, but not waterlogged, as this will help the cutting establish itself in its new home.
Things to Keep in Mind
Propagating succulents in water can be more unpredictable than soil propagation, as the cuttings are more vulnerable to rotting and infection as bacteria levels rise in the water. It is important to regularly check the water level and cleanliness of the container, and to remove any succulent cuttings that show signs of rotting or disease.
- Make sure to use a clean container with fresh water. Old, stagnant water can harbor bacteria and fungus that can harm your cuttings.
- Change the water every few days to keep it fresh and prevent any build-up of harmful substances.
- Use a clear container so you can easily see the succulent’s roots growing. This can also help the roots grow faster as they will be exposed to more light.
- Keep the container in a well-lit spot, but not in direct sunlight. Succulents can be sensitive to too much light and heat, which can cause the water to evaporate too quickly.
- Keep an eye on the water level and add more as needed to ensure that the succulent cuttings are always fully submerged.
Propagating Succulents from Seeds
Finally, propagating succulents from seeds is a much more advanced method that requires patience and a bit of luck. Not all succulents will produce seeds, and those that do may not produce viable seeds every time. I’ve never had any luck propagating succulents this way. Maybe one day I’ll have the patience!
When propagating succulents from seeds, you will need fresh seeds, a well-draining soil mix, and a sunny spot. Simply sprinkle the seeds over the soil mix, cover with a thin layer of soil, and water lightly. Keep the soil moist but not waterlogged and wait patiently for the seeds to germinate. This can take anywhere from a few weeks to several months, depending on the species and the conditions.
Propagating succulents from seed is a fun and rewarding way to add more plants to your collection. While it does require a bit more patience and effort than other methods like leaf or cutting propagation, the end result is a unique and fully-grown plant that you can take pride in nurturing from the very beginning.
In this guide, we’ll cover everything you need to know about propagating succulents from seed, including how to pollinate your plants, sow the seeds, and care for your seedlings as they grow. We’ll also provide tips for troubleshooting common issues and maximizing your chances of success.

Step 1: Pollinating Succulents for Seed Production
Before you can start propagating succulents from seed, you’ll need to pollinate the flowers to produce seeds. This step is only necessary for sexually reproducing succulent species, which typically have flowers that contain both male and female reproductive structures.
How to Pollinate Succulent Flowers
To pollinate your succulent flowers, you’ll need to transfer the pollen from the male structures (the stamen) to the female structures (the stigma). You can do this using a small paintbrush, cotton swab, or even a toothpick. Simply dab the pollen onto the stigma, being careful not to damage the delicate floral structures.
Step 2: Collecting Succulent Seeds
To collect succulent seeds after they have been pollinated, you will need to wait for the flowers to die back and for the seed pods to mature. This process can take anywhere from a few weeks to several months, depending on the specific type of succulent you are growing.
How to Remove the Seed Pods
Once the seed pods are mature, you can gently twist them off the plant and open them up to reveal the seeds inside. Be careful not to damage the seeds as you remove them from the pods.
Store the Seeds Properly
You can then store the seeds in a dry, cool place until you are ready to plant them. Be sure to label the seeds with the species and date so that you can keep track of when you collected them.
Step 3: Sowing Succulent Seeds
Once you have collected your succulent seeds, it’s time to sow them. Succulent seeds are quite small and can be easily overlooked, so it’s important to use a fine-grained seed starting mix and a shallow planting container. A tray or flat with drainage holes works well for this purpose.
To sow your seeds, simply sprinkle them over the surface of the seed starting mix, being sure to leave enough space between them for the seedlings to grow. Gently press the seeds into the mix, but don’t cover them with soil. Succulent seeds generally don’t require light to germinate, so you can place your tray in a spot that receives indirect light or keep it in a warm, dark location.
Step 4: Caring for Succulent Seedlings
Once your succulent seeds have germinated, it’s important to provide the young seedlings with the proper care to ensure their success. Here are a few tips to keep in mind:
- Water carefully: Seedlings are delicate and can easily be overwatered or drowned. To avoid this, use a watering can or spray bottle to gently mist the seedlings and soil with water. Only water when the top inch of soil is dry, and be sure to drain any excess water from the tray to prevent standing water.
- Provide light: As the succulent seedlings grow, they will need more light to thrive. Place the tray in a location that receives bright, indirect light, and consider using grow lights or a window with a south-facing exposure if necessary.

Step 5: Transplant
When your succulent has grown a good root system, it is ready to be transplanted into its permanent pot. Make sure to choose a pot that is only slightly larger than the root ball, as succulents do not need a lot of extra room to grow. Fill the pot with well-draining soil and gently place the succulent into the pot, making sure to cover the roots completely. Water the soil lightly and place the succulent in a location with bright, indirect light. Avoid direct sunlight for the first few days after transplanting, as it can cause the succulent to wilt or burn.
Watch the Moisture Level in the Soil
It is important to monitor the soil moisture level during the first few weeks after transplanting. The soil should be allowed to dry out slightly between waterings, as over-watering can lead to root rot. Once the succulent has acclimated to its new pot, you can resume your normal watering schedule.
What are some common mistakes to avoid when propagating succulents?
Some common mistakes to avoid when propagating succulents include:
• Using damaged or diseased leaves/cuttings.
Only use healthy plant material for propagation. Leaves or cuttings with damage, disease, or pest issues will root poorly and may infect your propagation.

• Not allowing cuttings to dry.
While not all succulents require this, many need cuttings to dry for a few days before propagation. This helps the cut end seal and prevents rot. If unsure, check recommendations for your specific succulent.

• Using potting soil or keeping rooting medium too wet.
Standard potting soil is too dense and moisture-retentive for succulent propagation. A well-draining rooting medium, like perlite and grit, and keeping it barely moist helps root growth while avoiding rot.

• Not providing enough light.
Light is essential for producing new roots and growth. Keep succulent propagations in a very bright spot out of direct sun. A transparent cover can help retain humidity while still allowing light to reach cuttings.
• Lack of patience.
Succulent propagation can take weeks or months. Avoid overhandling cuttings or disrupting rooting medium to check for progress. Leave propagations undisturbed until you observe new roots or growth to avoid interrupting the process. With proper conditions and patience, many succulents will root successfully in time.

• Not acclimating propagations gradually.
Once rooted, succulent propagations still need gradual adjustment to sun and moisture levels. Move them to more sun and less water slowly to allow new roots and growth to adjust, avoiding shock. Continue monitoring and protect them before planting in a permanent spot.
Avoiding these common mistakes will help your succulent propagation efforts succeed. The keys are using healthy plant material, a well-draining rooting medium, adequate light, moisture control, and patience through the process. With attention to these factors, you can achieve rewarding propagation results with your succulents.
How can I tell when a succulent propagation is ready to be planted?
Some signs that a succulent propagation is ready to be planted include:
• Developed root system.
Check for a healthy root system with noticeable white or cream-colored roots growing from the cut end or leaf/stem base. Succulent propagations need an established root system to support new growth once planted.
• New growth.
Look for signs of new growth such as fresh leaves, offsets, or shoots emerging from the propagation. Active growth indicates the propagation is ready to draw nutrients from soil and is prepared for life on its own.
• Hardened.
Gently squeeze or tug on the new growth to check that it is firm and hardened, not soft or easily damaged. As propagations produce roots and growth, the new tissue hardens. Until growth is toughened, propagations are more sensitive to changes and should remain in propagation conditions.
• Less dependent on humidity.
Note whether your propagation still needs very high humidity to support new growth. As propagations mature and grow their root system and tougher growth, they become less reliant on humidity and can transition to lower levels. This indicates readiness for planting in a pot or garden, where humidity will be lower.
• Fewer resources from leaves or cuttings.
Check that your propagation is producing its own strong roots and new growth, rather than still relying heavily on the original leaf or cutting. Once the propagation can sustain itself, it is ready to be independent from the leaf or stem. If it has formed its own robust root system and hardened growth, it likely no longer needs the original leaf or stem to remain attached.
When your propagation shows these signs, it is likely ready to be planted. The strong and hardened root system and growth indicate it can draw necessary resources from soil and is prepared for a less sheltered environment. With the proper planting and care, your established succulent propagation should continue to thrive and grow once moved from propagation conditions.
What are some common mistakes to avoid when transitioning my propagation?
Some common mistakes to avoid when transitioning a succulent propagation include:
• Moving it to full sun too quickly.
Even if your propagation seems ready, sudden exposure to intense sun can shock it. Gradually increase light levels over time to allow the new growth to adjust to higher light conditions. Watch for any stress and provide shade if needed.
• Decreasing water too rapidly.
While your propagation may not need as much moisture once planted, a quick decrease in water can dry it out before the roots are prepared to draw enough from the soil. Slowly decrease frequency of watering and amounts to allow the root system to adjust to less available moisture. The pace of this transition will depend on your propagation and climate conditions.
• Changing conditions drastically.
In general, avoid making major, sudden changes to your propagation’s conditions. Gradual adjustments to light, water, and humidity give new roots and growth time to acclimate to the changes. Rushing the transition process can stress or shock your propagation, slowing its progress. Making changes slowly and consistently monitoring for any issues will help your propagation transition successfully.
• Not protecting propagations before permanent planting.
Even once a propagation can handle decreased humidity and moisture, it is still adjusting to independent life. After transitioning conditions and before planting in a permanent spot, it is a good idea to keep your propagation in a sheltered area. This gives it more time to toughen and ensure it is prepared for exposure to the elements and potential pests or disease. After a week or so of protection, your propagation should be ready for planting in a pot or garden.
Avoiding these common mistakes will help your succulent propagation transition smoothly to life on its own. The keys are making gradual changes, monitoring your propagation closely, and providing protection before permanent planting. With attention to the transition process, your established propagation should continue to thrive once moved from propagation conditions.
But wait, there’s more!
What is rooting hormone and how does it work?
Rooting hormone is a substance that promotes the development of roots in when propagating succulents. It can be found in a variety of forms, including liquid, powder, and gel. Rooting hormone contains auxin, a plant hormone that promotes root growth. When applied to the cut end of a plant cutting, rooting hormone helps stimulate the production of roots, increasing the chances of successful propagation.
Rooting hormone can be used on a wide range of plants, including succulents, to encourage root growth and successful propagation. To use rooting hormone, follow the instructions on the product packaging and apply it to the cut end of the plant cutting before planting it in soil or water.
How do you sterilize garden tools?
To sterilize garden tools before propagating succulents, follow these steps:
- Clean the tools thoroughly with water and soap to remove any dirt or debris.
- Rinse the tools with clean water and dry them completely.
- Disinfect the tools with a solution of 1 part water and 9 parts rubbing alcohol, or a solution of 1 part water and 1 part household bleach.
- Wipe the tools down with a clean cloth or paper towel to remove any excess solution.
- Allow the tools to air dry completely before using them again.
Alternatively, you can also sterilize garden tools by heating them up. This can be done by dipping them in boiling water or heating them with a propane torch or in an oven. However, be careful not to damage the tools with extreme heat.
Q&A on common questions about propagating succulents:
What are the best conditions for propagating succulents?
To propagate succulents successfully, you should provide them with plenty of sunlight and well-draining soil. You should also water them deeply, but allow the soil to dry out between watering. This will help prevent the roots from rotting.
What are the best methods for propagating succulents?
The most common methods for propagating succulents include:
- Water propagation: This involves placing a leaf or cutting in water, allowing it to grow roots, and then planting it in soil.
- Soil propagation: This involves planting a succulent leaf or cutting directly in soil, where it will grow roots and eventually form a new plant.
How long does it take for succulent cuttings to grow roots?
The time it takes for succulent cuttings to grow roots can vary, but it usually takes anywhere from a few days to a few weeks. The exact time will depend on the type of succulent, the propagation method being used, and the conditions in which the cutting is being grown.
How do I know when my succulent cutting is ready to be transplanted?
You will know your succulent cutting is ready to be transplanted when it has grown a sufficient number of roots and is showing signs of new growth. This can take anywhere from a few days to a few weeks, depending on the type of succulent and the conditions in which it is being grown. I usually wait until the cutting or leaf is at least 1/3 the size of the mother plant to transplant it again.
What are the most common mistakes people make when propagating succulents?
Some common mistakes people make when propagating succulents include:
- Overwatering: This can cause the roots to rot, which will kill the cutting.
- Not providing enough sunlight: Succulents need plenty of sunlight to grow and thrive, so be sure to place them in a sunny spot.
- Using the wrong soil: Succulents need well-draining soil to prevent their roots from rotting. Be sure to use a soil mix specifically designed for succulents.
Can I propagate any type of succulent?
Not all types of succulents can be propagated successfully. Some succulents, such as those with thick, fleshy leaves, are more difficult to propagate than others. It’s always best to research the specific type of succulent you are trying to propagate to determine the best method and success rate.
Succulent Propagation Timeline Examples
I realized I’ve taken a lot of succulent propagation progress pics, but haven’t put them all together. Hopefully, these propagation timelines will give you an idea of how long propagation takes.
Aeonium Top Cutting
January 6, 2023
I can’t remember when I took the cutting, but I think it was a couple of weeks before this picture was taken

January 27, 2023
(21 days)

February 6, 2023
(31 days)

March 6, 2023
(59 days)

March 18, 2023
(71 days)

April 1, 2023
(84 days)

Graptoveria ‘Fred Ives’ Propagation Timeline
I had an overly large ‘Fred Ives’ in my succulent fountain and I needed to cut the head off before it got too heavy. Below is a week by week progression of pup growth on the stem.
Let’s call this Week 0

1 Week

2 Weeks

4 Weeks

5 Weeks

8 Weeks

Timeline of Echeveria ‘Blue Atoll’ Propagation
February 6, 2023
I think I first cut the head off of this Echeveria around the middle of January.
Teeny tiny little pink pups are forming in the center

March 8, 2023
The first 2 pups have gotten larger and new pups have appeared.

March 17, 2023
Removed that dead leaf from above. Pups are getting bigger and more are showing up on the stem.

April 1, 2023

April 6, 2023
Things are starting to get a little more crowded. I need to think about how I’m going to proceed next.

Propagating Succulent Leaves in a Seedling Tray


Somebody Said it Couldn’t Be Done… Propagating Aeonium Leaves
Granted, I’m experimenting with propagating Aeonium haworthii leaves which are much more plump and juicy than other, thinner leafed varieties. I was trimming up my yard and was going to throw these cuttings away, but decided against it. Let’s see what happens!
March 28, 2023

April 20, 2023
One thing that excites me is that there’s lots of pink and red on the ends. To me, that’s very promising that new growth is ahead. What excited me even more is that one of the leaves had a tiny nubbin growing that looks just like other leaves. Crossing my fingers!
